Inside Oracle Fusion: The Transfer Orders


Inside Oracle Fusion: The Transfer Orders

Transfer Orders in Oracle Fusion play a pivotal role in facilitating inter-organization or intra-organization movement of goods within an enterprise.

Transfer Orders (TOs) enable movement of goods between two inventory organizations OR between two subinventories within the same inventory organization.

For the process to function correctly, several setups must be configured in Oracle Fusion.
Below is an elaboration of each critical configuration point.


1.      Item Attributes – “Internally Transferrable” & “Transfer Orders Enabled”

Before an item can be used in a Transfer Order, it must be properly configured in the Product Information Management (PIM) module.
The following attributes play a vital role:

  • Internally Transferrable:
    • This attribute allows the item to be transferred between inventory organizations within the enterprise.
    • If disabled, the item will not appear as eligible for Transfer Orders.
  • Transfer Orders Enabled:
    • This flag ensures the item can be included in transfer transactions that use the Transfer Order document type.
    • It works in conjunction with the internal material transfer flow defined in Supply Chain Execution.


Note: Always ensure both attributes are enabled at the item master level and propagated to all associated inventory organizations.

2.      Item Assignment to Both Inventory Organizations

For the item to be shipped from one org and received into another, it must be assigned to both the source and destination inventory organizations.

  • The system must recognize the same Item ID and definition across both orgs; otherwise, the Transfer Order creation or shipment process will fail.
  • Additionally, costing and valuation attributes should align if both organizations belong to the same cost organization.
    This ensures consistency in item data, UOM conversions, and cost processing across the two organizations involved in the transfer.


3.      Manage Interorganization Parameters (Shipping Network)

This is the heart of Transfer Order configuration — it defines the relationship between the source and destination organizations.

Navigation:
Setup and Maintenance → Manufacturing and Supply Chain Materials Management → Manage Interorganization Parameters

Key configurations:

·       From OrganizationTo Organization (pairing)

·       Transfer Type: In-transit or Direct

·       Receipt Routing: Applicable for In-transit transfer types.

·       Expense or Inventory Destination: Determines if the goods will be received into inventory or charged as expense.

Impact:
These parameters control the logistics, costing, and accounting behaviour of the Transfer Order flow.


4.      Manage Transit Time with Default Ship Method Assignment

This setup defines the expected transit duration and shipping method between organizations.

Navigation:
Setup and Maintenance → Manufacturing and Supply Chain Materials Management → Manage Transit Times

Configurations:

·       Define Origin (Location associated with the Source Org) and Destination (Location associated with the Destination Org) pairing.

·       Assign Ship Method and Transit Time (in days or hours).

·       Specify Default Ship Method

Purpose:

·       Helps in calculating expected receipt dates in planning and execution modules.

·       Used by Supply Chain Orchestration and Order Management to schedule delivery and receiving operations.


5.      Shipping Parameters for Source Organization (Shipping Org)

The source organization acts as the shipping organization, and its shipping setup determines how shipments are executed.

Navigation:
Setup and Maintenance → Manufacturing and Supply Chain Materials Management → Manage Shipping Parameters

Key configurations:

·       Default Release Sequence Rule and Ship Confirm Rule.

·       Default Pick Slip Grouping Rules – determines grouping of shipments.

This ensures that the Transfer Order Shipment process (Pick → Ship Confirm) executes seamlessly from the source warehouse.

6.      Receiving Parameters for Destination Organization (Receiving Org)

The destination organization acts as the receiving organization, and its parameters define how incoming goods are processed.

Navigation:
Setup and Maintenance → Manufacturing and Supply Chain Materials Management → Manage Receiving Parameters

Key configurations:

·       Receipt Routing: Direct Delivery, Inspection Required, or Standard Receipt.

This controls the behaviour of receipt transactions, in-transit accounting, and inventory updates when goods arrive at the destination org.


Executing and Scheduling the Reports in Oracle Fusion


Executing and Scheduling the Reports in Oracle Fusion

For reports that process large volumes of data, it is recommended to use the Schedule option instead of running them interactively. Scheduling reports helps avoid browser timeouts, improves system performance, and ensures that report outputs are delivered directly to users via email.

Follow the steps below to execute or schedule reports in Oracle Fusion.

1.      Select the Report and Click on ‘More’ option as shown below-

2.      Select the Report and Click on ‘More’ -> Schedule option as shown below-

3.      Enter the details as below-

General: Select the required Parameters

Output: Just click on Add Destination and enter the email address to whom the report output should be sent.

You can add multiple email IDs with coma separation.

 Schedule: For one time execution – Do not make any changes here.

Auto scheduling:

You can set the report to run automatically on daily or weekly as per the required schedule by selecting the frequency as shown below-

Specify the Start and End Dates

Notifications: You can specify your email address here for automatic notification on completion of the report.


Best Practices

  • Use scheduled execution for reports containing large volumes of data.
  • Configure email delivery to avoid downloading outputs manually.
  • Set recurring schedules for reports that are required regularly.
  • Monitor notifications to identify and resolve any execution issues promptly.
  • Review report parameters carefully before scheduling recurring jobs.

Expected Outcome

Upon successful submission, Oracle Fusion will execute the report according to the defined schedule and automatically deliver the output to the designated recipients via email. Users will also receive status notifications, ensuring seamless monitoring and management of report execution.


Items LOV is Empty in Redwood UI for Inventory Transactions


Items LOV is Empty in Redwood UI for Inventory Transactions

Issue Description:

Sometime users intermittently report an issue across several Oracle Fusion Redwood pages, including:

·       Create Miscellaneous Transaction

·       Subinventory Transfer

·       Create Unordered Receipt

When attempting to search for an inventory item, the Item List of Values (LOV) sometimes returns no results, even though the item exists in the system with correct configurations and org assignments.

As a result, users are unable to select the required item and therefore cannot create or complete the corresponding inventory transactions. This issue can impact day-to-day warehouse and inventory operations and may lead to transaction processing delays.


Resolution:

To ensure that items are correctly displayed in the Item LOV on Redwood pages, perform the following configuration and validation steps.

1. Enable the Required Opt-In Feature

Verify that the Oracle Fusion opt-in feature "Search Items Using the New User Interface" is enabled.

  • Enable this opt in to an offering in the Product Management > Items portion of the offerings.

2. Configure and Rebuild the Item Search Index

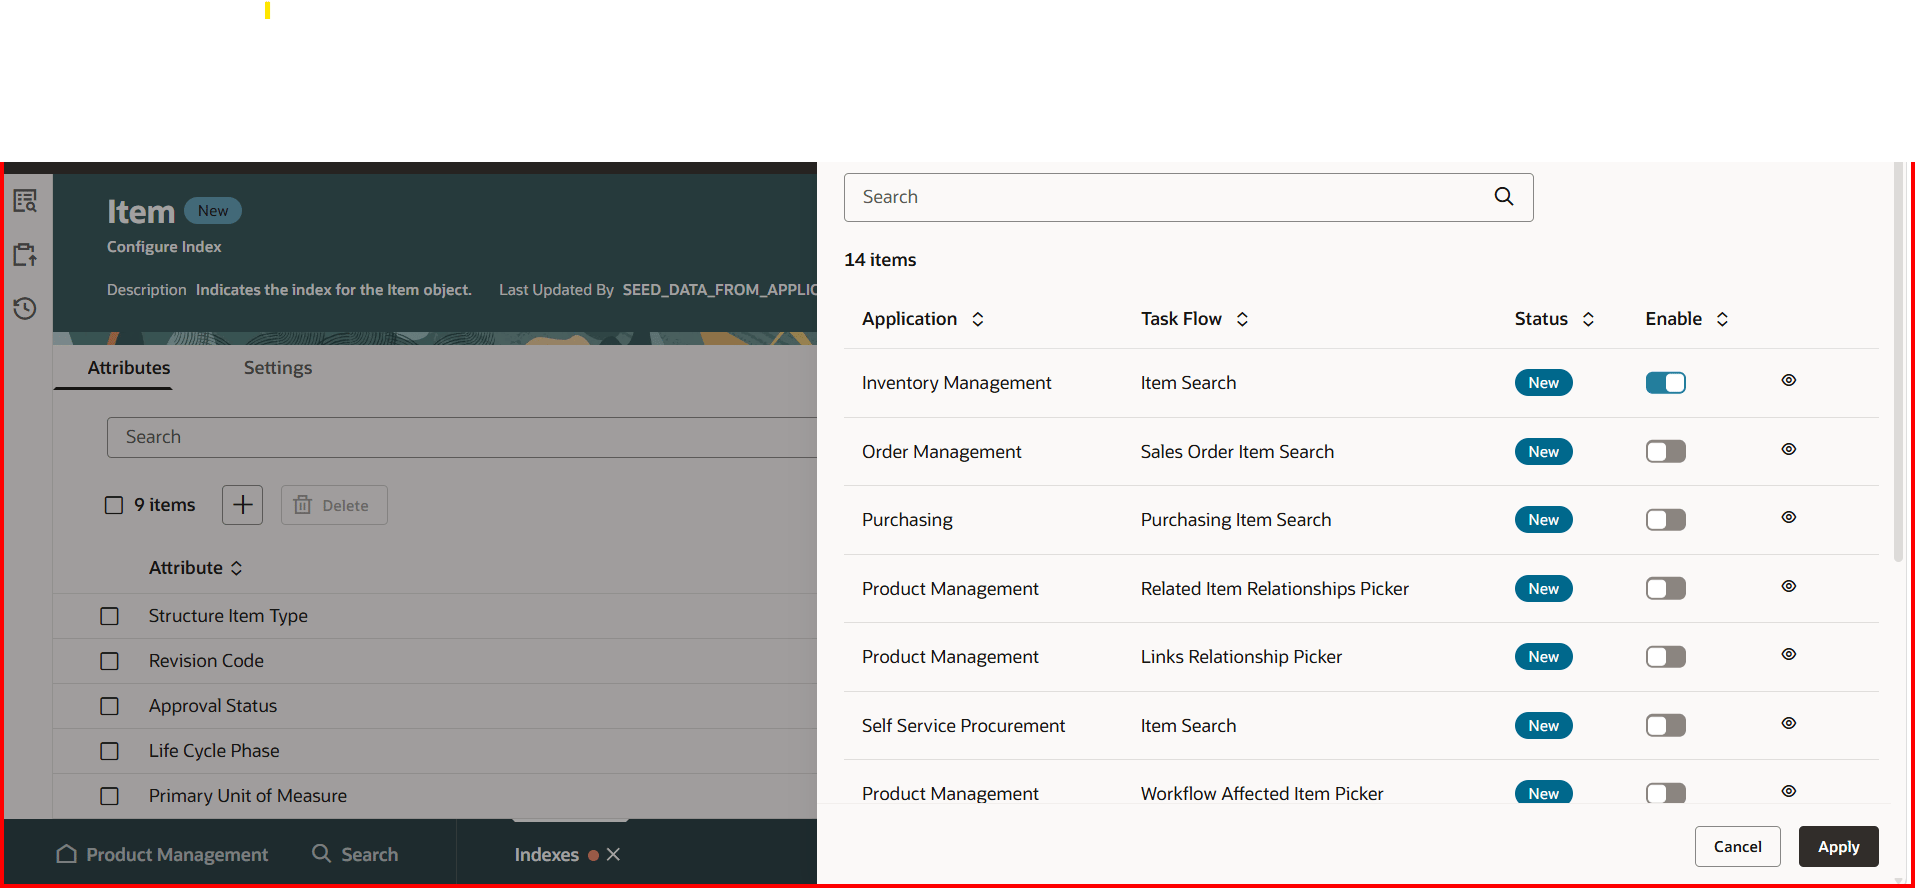
The Redwood item search functionality relies on the item index. Ensure that the index is properly configured for Inventory Management. This can be done by going to the Product Management heading in the navigator bar> Show More > Configure Application > Indexes.

1.      Click the Item Index

2.      Click the 3 Dots in the upper right -> Enable attribute sets

3.      Enable for Inventory Management.

4.      Once this is done, the Index needs to be rebuilt.

5.      Click Save

6.      Click the 3 Dots -> Rebuild -> Schedule for Now

This will generate a scheduled process.

Once the jobs are done, users need to log out and back in, and the items will be visible in the LOV.


Important Note:

To configure and rebuild the index, the user must have the privilege EGP_ACCESS_LANDING_PAGE_PRIV added to the role.

This privilege is available in the standard roles Product Manager and Product Data Steward. You can add these roles to the user ID and Run LDAP programs.

1.      Send Pending LDAP Requests

2.      Retrieve Latest LDAP Changes

3.      Import User and Role Application Security Data


Min-Max Planning - Unleash the Knowledge

  Min-Max Planning – Introduction: Min-Max Planning is an inventory replenishment method in Oracle Fusion Supply Chain Management (SCM) th...